# Localizing an Email
Localize an email to translate content and adapt your email to different countries, regions, or languages.
Localizations are available with all Teams+, Enterprise, and Custom accounts and can be managed in the email builder or via the Dyspatch API.
## Localization Options in Dyspatch
1. [Creating a Localization in a Dyspatch Email Builder.](/localization/localizing_an_email/#creating-a-localization-in-the-dyspatch-email-builder) Continue reading this article to find out how you can create localizations and translate content without leaving the email builder.
2. [Creating Localizations Using POT and PO files.](/localization/uploading_localizations) Go to this article to learn how to use POT and PO files to upload translations to the email builder.
3. [Localizing with the Phrase Strings and TMS Integrations.](/localization/phrase_localization) See how to sync your Phrase Strings or TMS account with your Dyspatch emails with just a few clicks.
4. [Localizing with the Smartling Integration.](/localization/smartling_localization) See how to sync your Smartling account with your Dyspatch emails with just a few clicks.
5. [Creating Localizations with the Dyspatch API.](https://docs.dyspatch.io/api/#tag/Localizations) Use the Dyspatch API to handle your localization workflow programmatically outside of the email builder.
## Creating a Localization in the Dyspatch Email Builder
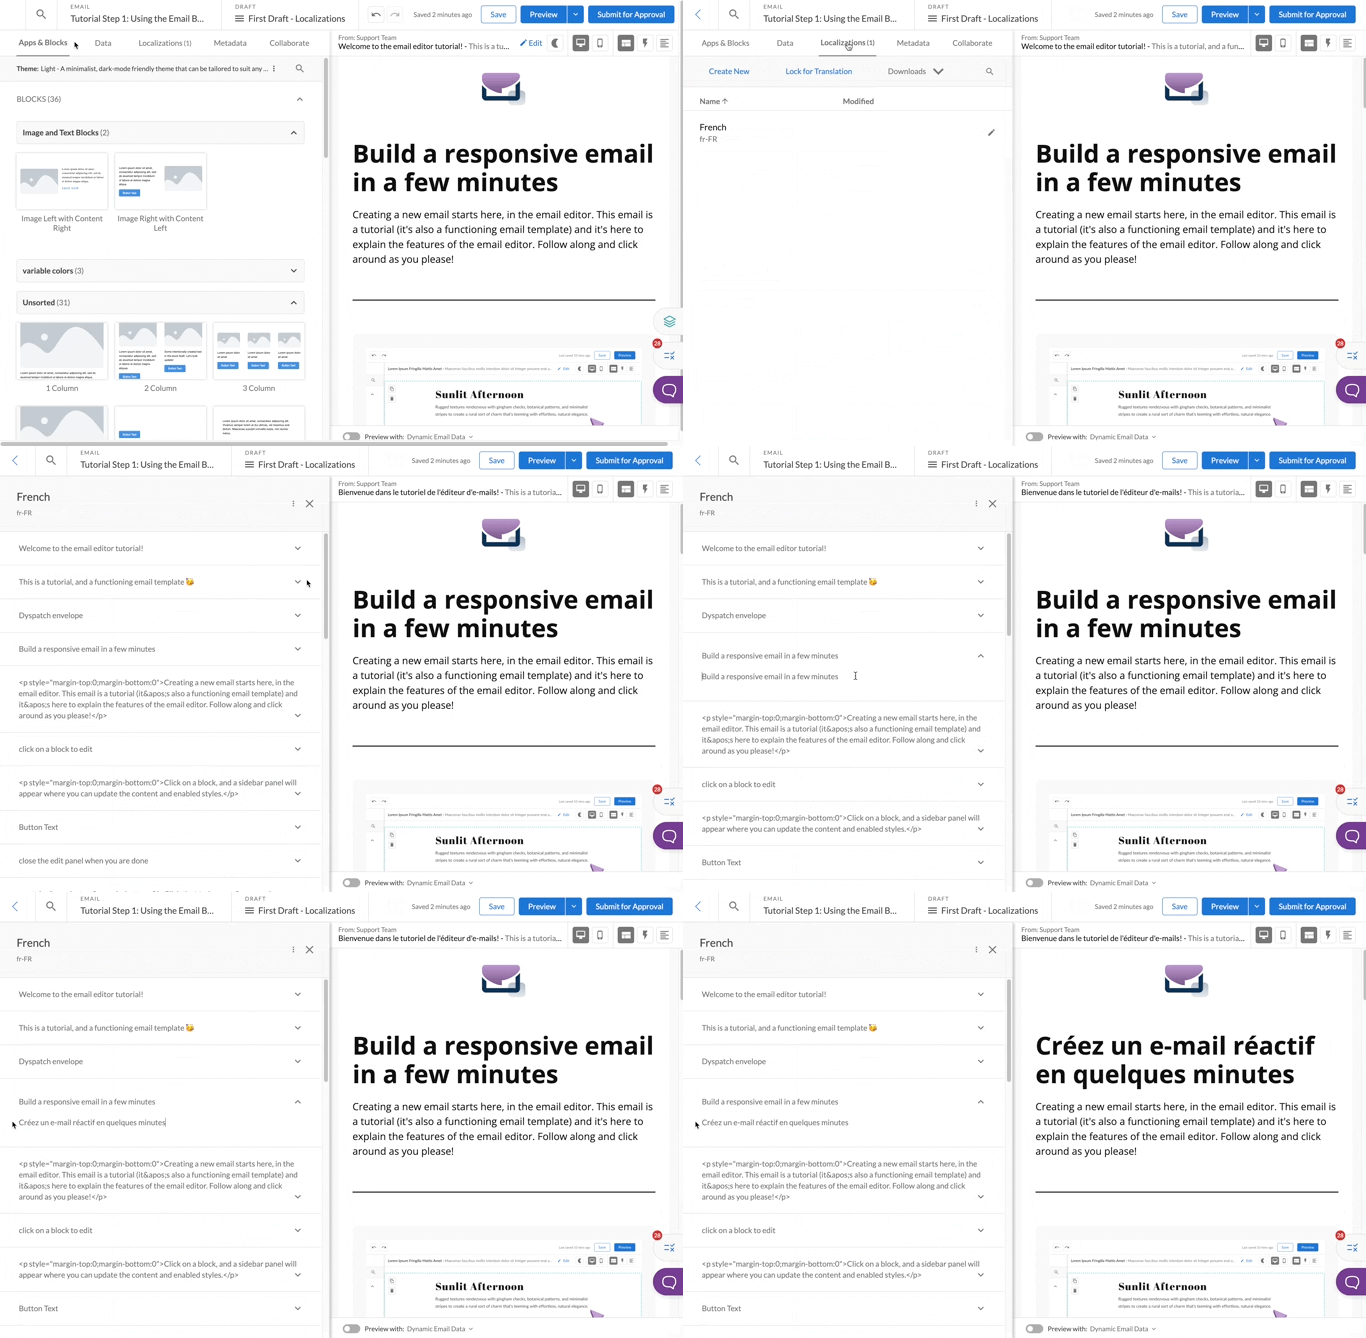
Navigate to the Localizations tab in the email builder to create a new localization. Select a language and give the localization a name that your team will recognize. This name is for your reference only and can follow any naming convention that works for your team.

We recommend creating a localization for the original language of the email. This way when the localizations for an email are accessed via the API, all of the desired localizations are present, including the language in which the email was originally built.
### Add Translations
When a localization is selected, the editor’s preview pane will show your email with the selected localization's translated content. Select the content you wish to translate to enter in your translation.
 ## Preview a Localization
The localizations you’ve created are available for and test sending in the Preview area. Select a localization from the drop-down to preview the localized version of your email on selected devices.
## Preview a Localization
The localizations you’ve created are available for and test sending in the Preview area. Select a localization from the drop-down to preview the localized version of your email on selected devices.
 ## Commenting on Localized Content
Dyspatch makes it easy to collaborate with your team — including leaving feedback on specific locales when you're working with localized content. For more details on using comments, check out our Leaving Feedback with Comments guide.
## Export Localizations
Once you're happy with your translated content and have published your email, all locales will export to your integrated ESP or be included in your export files. See the full list of [integration options here](/integrations/).
## Commenting on Localized Content
Dyspatch makes it easy to collaborate with your team — including leaving feedback on specific locales when you're working with localized content. For more details on using comments, check out our Leaving Feedback with Comments guide.
## Export Localizations
Once you're happy with your translated content and have published your email, all locales will export to your integrated ESP or be included in your export files. See the full list of [integration options here](/integrations/).
Not seeing localization in your account?
Contact us to upgrade to a Teams+ or other supported account.