# Implementing Dyspatch
Dyspatch helps you take emails out of your code base, allowing content creators to build complex emails free from the
deployment process. When it comes time to send an email, how does Dyspatch fit in? This guide outlines how to integrate
Dyspatch into your system, and the steps to make Dyspatch a part of your email sending pipeline.
## Email Life Cycle
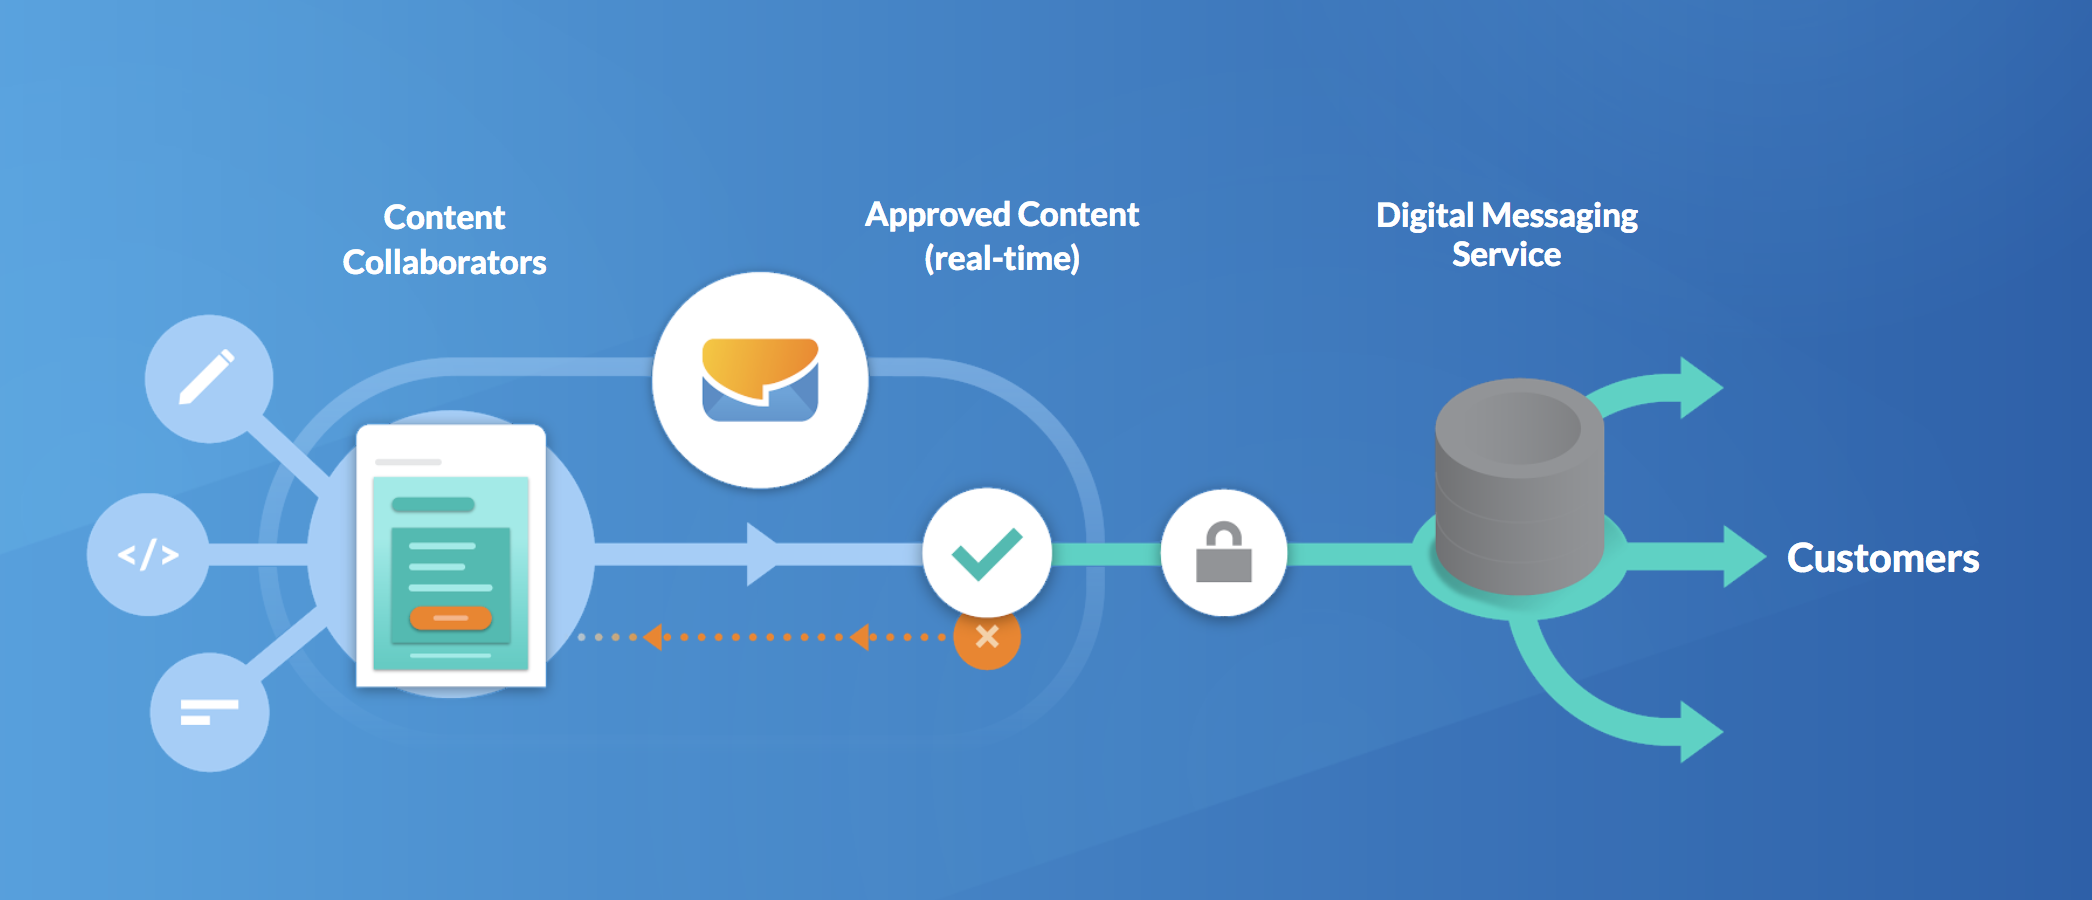 Create, collaborate, and approve email content in Dyspatch. The
Dyspatch API exposes approved emails built by your team. A **Digital Messaging Service** built in your system will
store and build emails from the compiled emails taken from the Dyspatch API. How your Digital Messaging Service
functions can vary depending on your organization's goals, but there are two main processes we'll outline below to get
you started.
Create, collaborate, and approve email content in Dyspatch. The
Dyspatch API exposes approved emails built by your team. A **Digital Messaging Service** built in your system will
store and build emails from the compiled emails taken from the Dyspatch API. How your Digital Messaging Service
functions can vary depending on your organization's goals, but there are two main processes we'll outline below to get
you started.
For this article, template is synonymous with email. This process can also be done with SMS,
Push, and Voice
## Digital Messaging Service
In order to effectively send emails with the most current content from your Dyspatch account, two functions will need to
be performed by your Digital Messaging Service: **Template Sync** and **Template Render**. Template Sync to update your
stored emails with any new content in Dyspatch, and Template Render to build a customer email from a template.
## Template Sync
There are two main ways to keep your emails in sync. The simplest is by regularly polling the Dyspatch API. A sync of
your emails on Dyspatch can be performed on a regular schedule (once per minute maximum) to update your datastore with
any newly published content. This is great to start, but can start slowing down if your account has thousands of emails.
The second method is by [using webhooks](/integrations/setting_up_webhooks/) to fetch updated content once an email is
published by your team.
### Polling Template Sync Steps
#### 1. Fetch List of Templates
Use the Dyspatch _List Templates_ API
to get a list of your emails.
 You'll receive a paginated response with all of your emails and their details. See
_List Templates_ to view details of
the response.
#### 2. Compare _updatedAt_ Date-time
Compare the _updatedAt_ fields to find newly published or updated templates.
You'll receive a paginated response with all of your emails and their details. See
_List Templates_ to view details of
the response.
#### 2. Compare _updatedAt_ Date-time
Compare the _updatedAt_ fields to find newly published or updated templates.
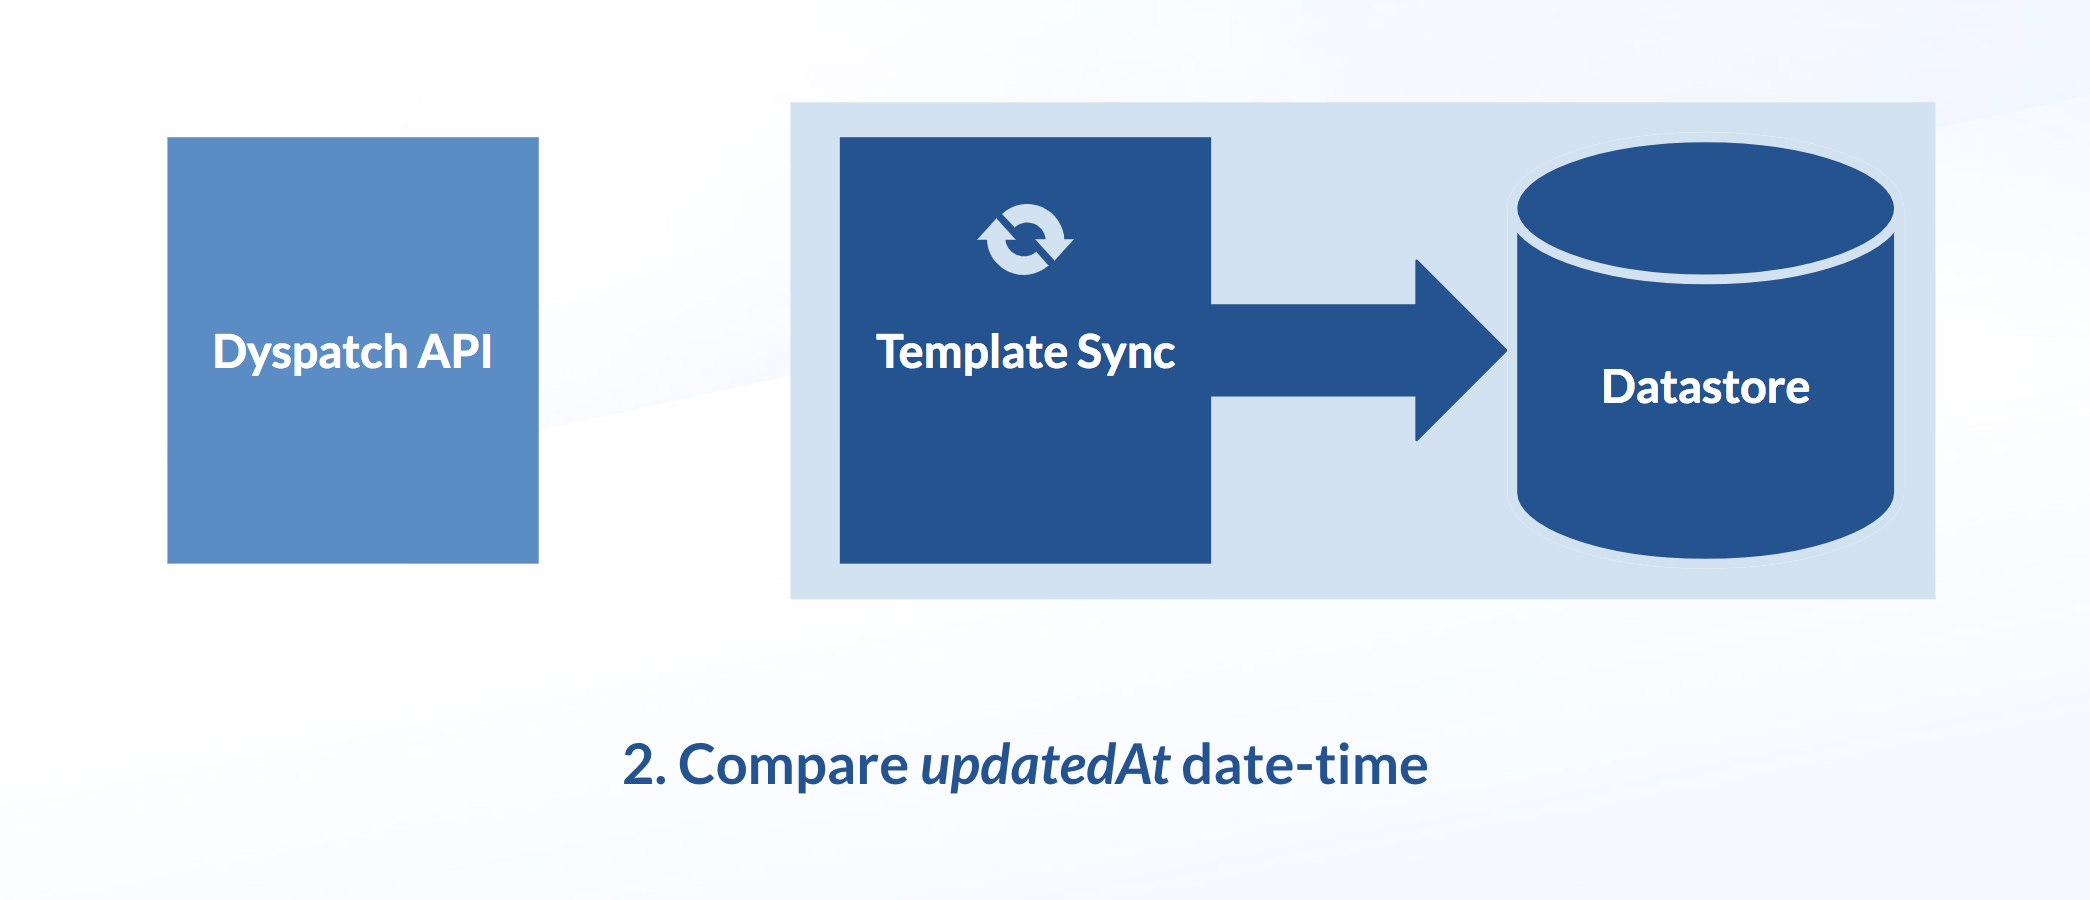 The first time you pull your emails and set up your datastore, you'll need to pull all your organization's templates.
Once your templates have been cached, you can target the templates that are new or have been updated. This can be done
by comparing the _updatedAt_ fields on the templates in your datastore with the corresponding templates from the List
Templates response.
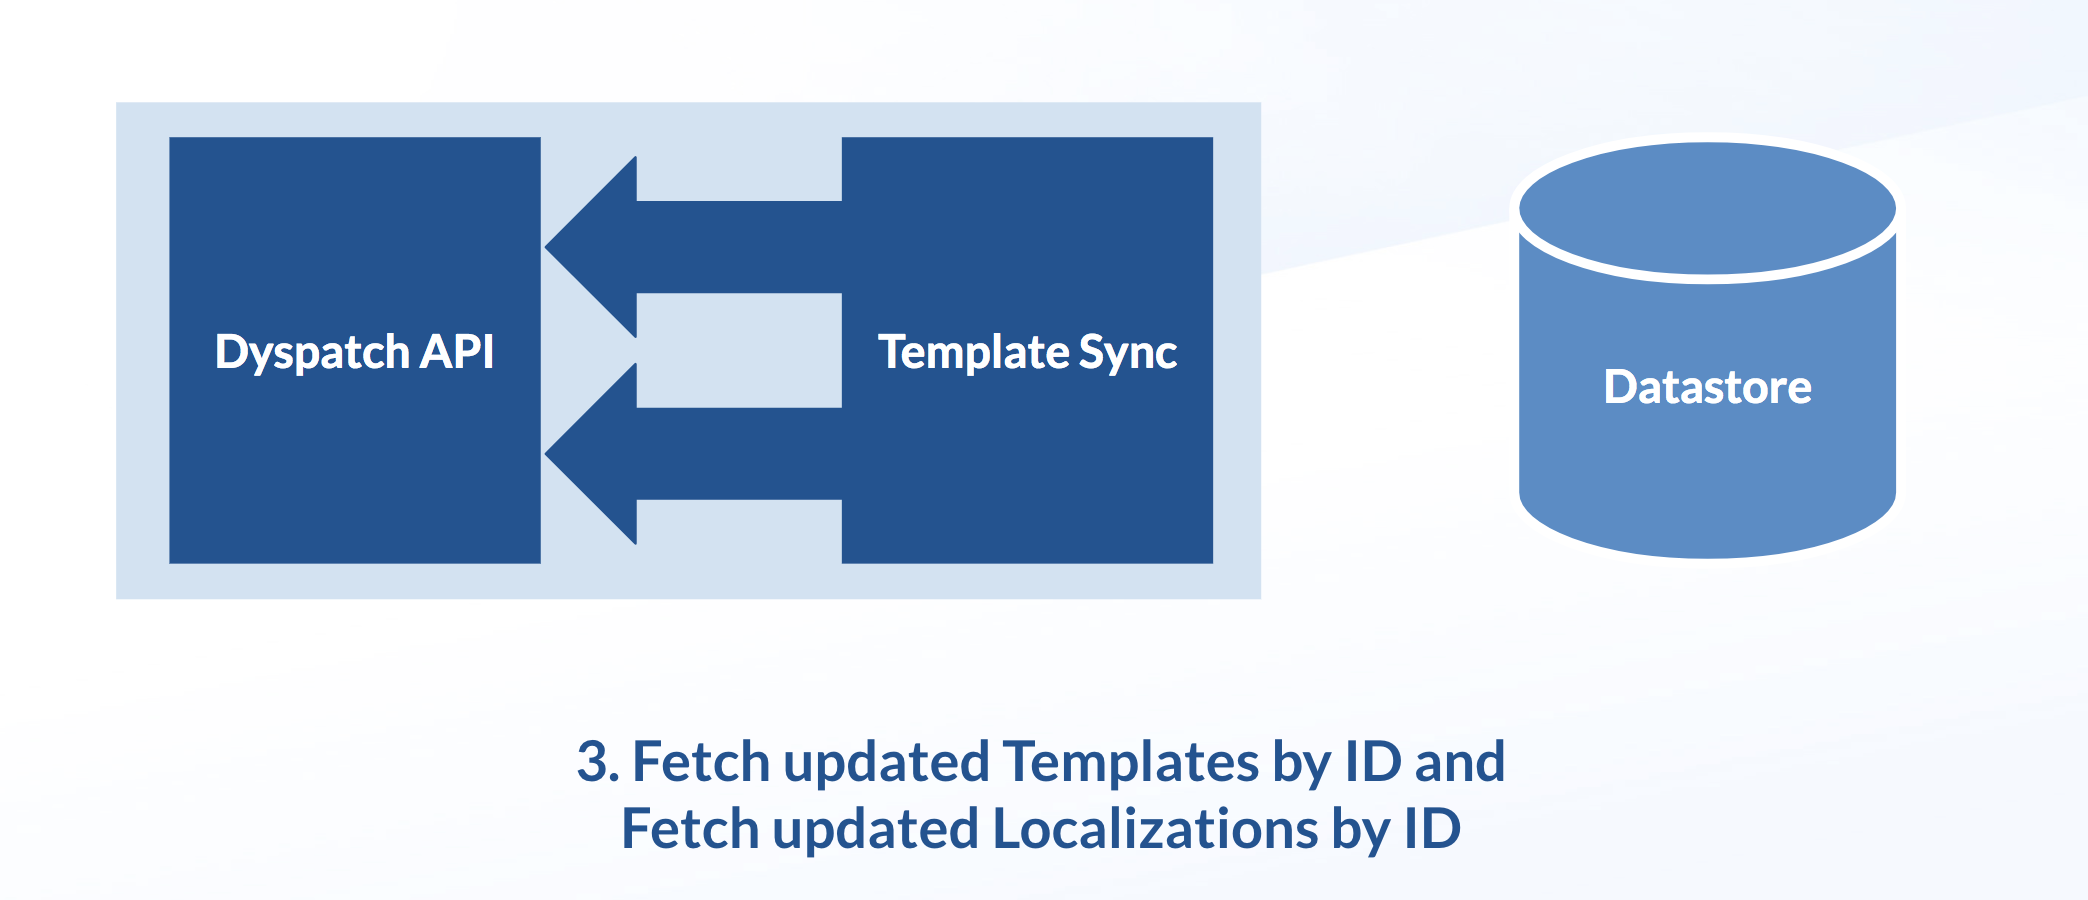
#### 3. Fetch Updated Content
Use _Get
template by ID_ for each template and
_Get
localization object by ID_ to get each updated individual template localization.
The first time you pull your emails and set up your datastore, you'll need to pull all your organization's templates.
Once your templates have been cached, you can target the templates that are new or have been updated. This can be done
by comparing the _updatedAt_ fields on the templates in your datastore with the corresponding templates from the List
Templates response.
#### 3. Fetch Updated Content
Use _Get
template by ID_ for each template and
_Get
localization object by ID_ to get each updated individual template localization.
 We recommend your datastore caches the full API response.
#### 4. Update Your Datastore
Update your template datastore with the new and updated emails.
We recommend your datastore caches the full API response.
#### 4. Update Your Datastore
Update your template datastore with the new and updated emails.
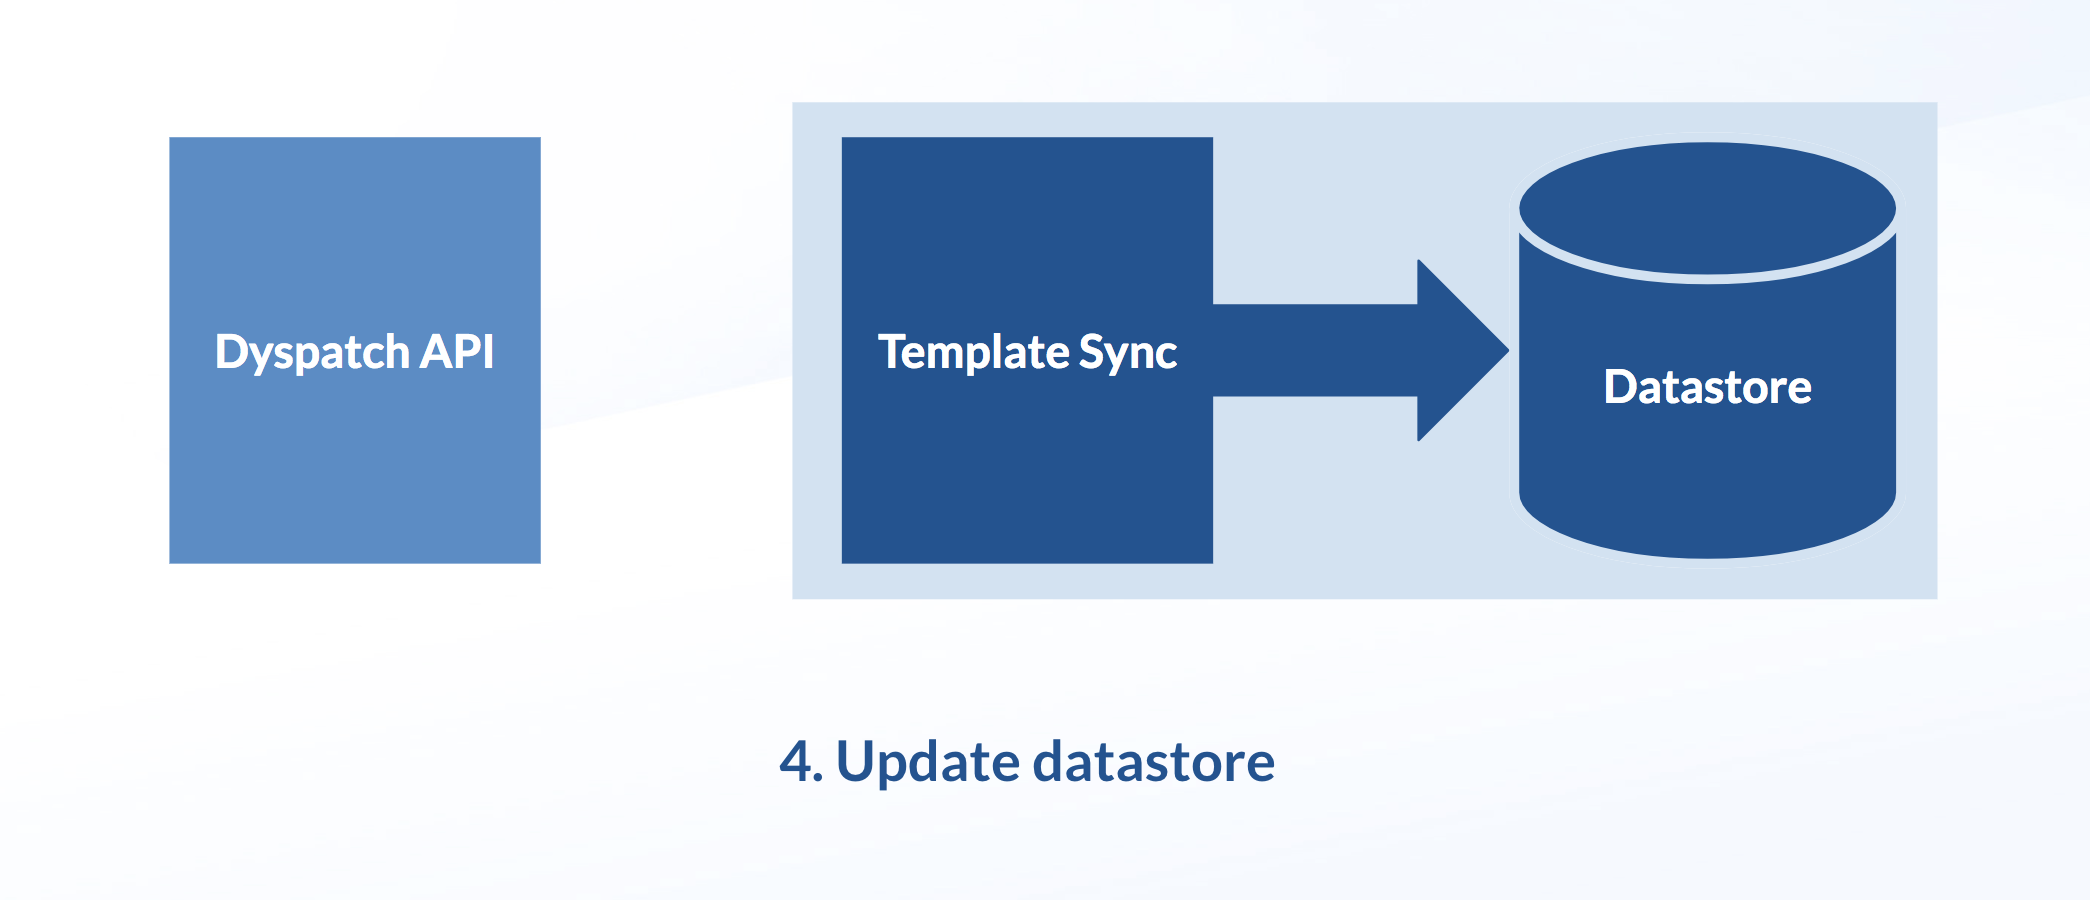 Your datastore should now be synced up with Dyspatch and the new and updated templates are available for use in the next
step: [Template Render](#template-render).
### Using Webhooks
#### 1. Implement a receiving server
Start by configuring a webhook integration in Dyspatch.
See our documentation for examples of
the shape of the webhook. We recommend triggering your fetch off of the `template_published` and `template_republished`
events to ensure your published templates in Dyspatch match what's in your template datastore.
Your datastore should now be synced up with Dyspatch and the new and updated templates are available for use in the next
step: [Template Render](#template-render).
### Using Webhooks
#### 1. Implement a receiving server
Start by configuring a webhook integration in Dyspatch.
See our documentation for examples of
the shape of the webhook. We recommend triggering your fetch off of the `template_published` and `template_republished`
events to ensure your published templates in Dyspatch match what's in your template datastore.
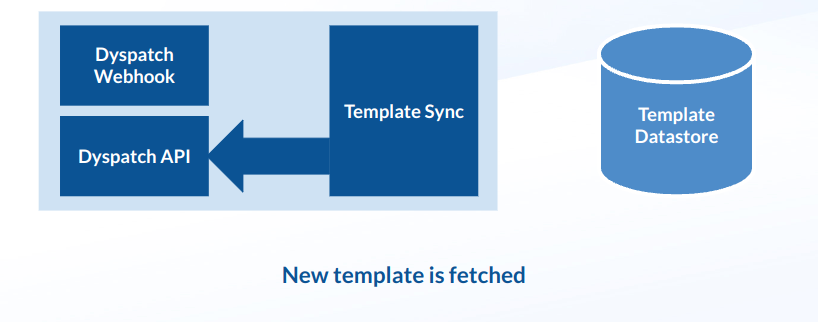
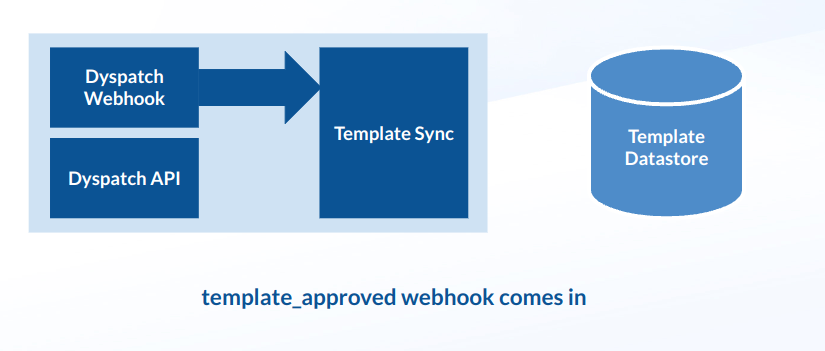 #### 2. Fetch the new template
When a `template_published` or `template_republished` webhook comes into your template service it should then make a
Get Template by ID request to the
Dyspatch API. Make sure to specify the target language of your rendering environment.
#### 2. Fetch the new template
When a `template_published` or `template_republished` webhook comes into your template service it should then make a
Get Template by ID request to the
Dyspatch API. Make sure to specify the target language of your rendering environment.
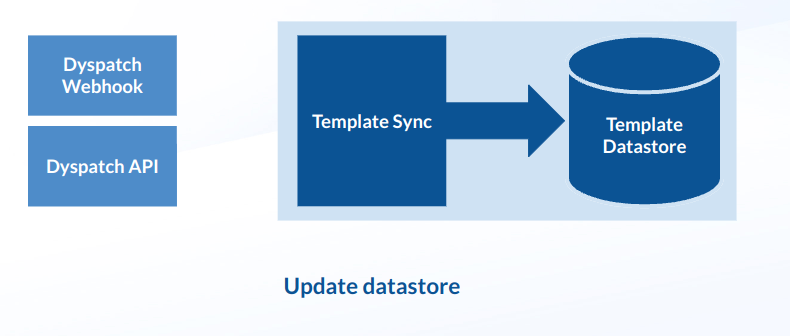
 #### 3. Update your Datastore
After your template service has fetched a template, it needs to store any relevant fields (eg: HTML, subject line, text
version, etc) into the datastore to be used later. Note that these fields are base64 encoded and they will need to be
decoded at some point during your render pipeline.
#### 3. Update your Datastore
After your template service has fetched a template, it needs to store any relevant fields (eg: HTML, subject line, text
version, etc) into the datastore to be used later. Note that these fields are base64 encoded and they will need to be
decoded at some point during your render pipeline.
 ## Template Render
When it comes time to send an email, pull a template from your datastore, insert the necessary data, and render the
template to build an email.
### Template Render Steps
#### 1. Send Request Initiated
A send request is made by your system to your Digital Messaging Service.
## Template Render
When it comes time to send an email, pull a template from your datastore, insert the necessary data, and render the
template to build an email.
### Template Render Steps
#### 1. Send Request Initiated
A send request is made by your system to your Digital Messaging Service.
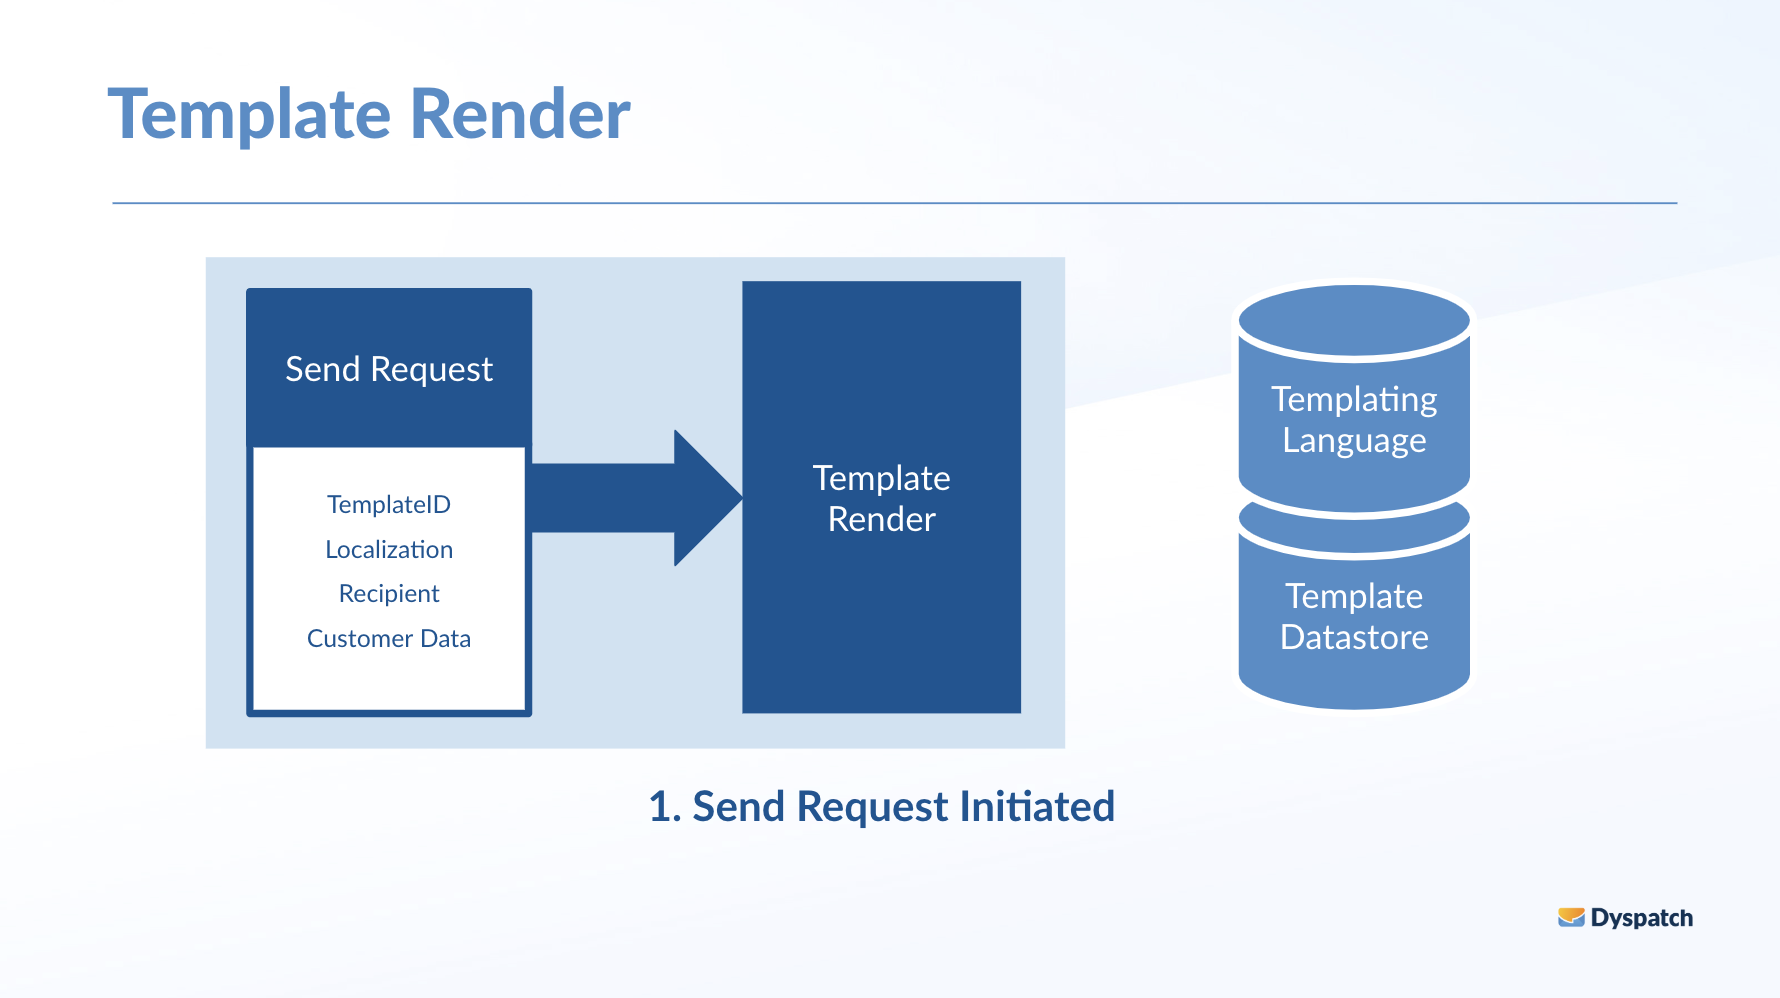 The send request from your system should request a template by ID and will need to provide a recipient address and any
necessary customer data to customize the email for the recipient.
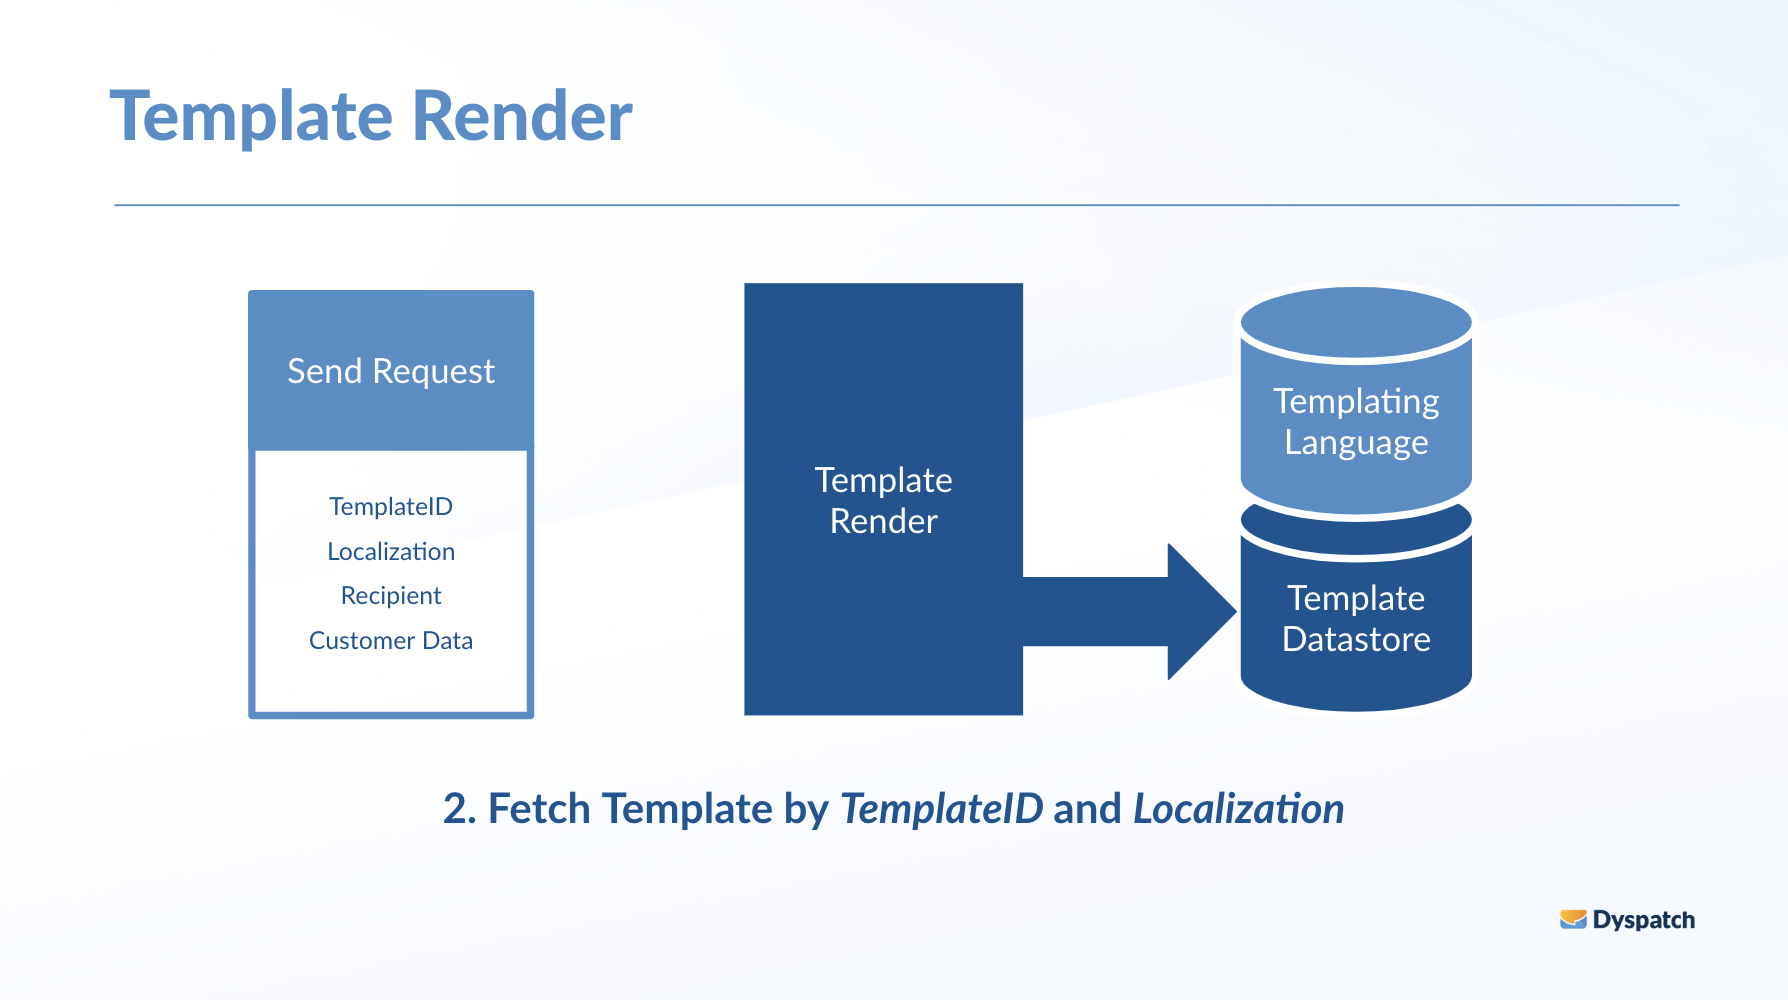
#### 2. Fetch Template
Fetch the requested email using its template ID and, if needed, its locale from your template datastore.
The send request from your system should request a template by ID and will need to provide a recipient address and any
necessary customer data to customize the email for the recipient.
#### 2. Fetch Template
Fetch the requested email using its template ID and, if needed, its locale from your template datastore.
 #### 3. Prepare Data
Prepare the template for render by inserting the recipient information.
#### 3. Prepare Data
Prepare the template for render by inserting the recipient information.
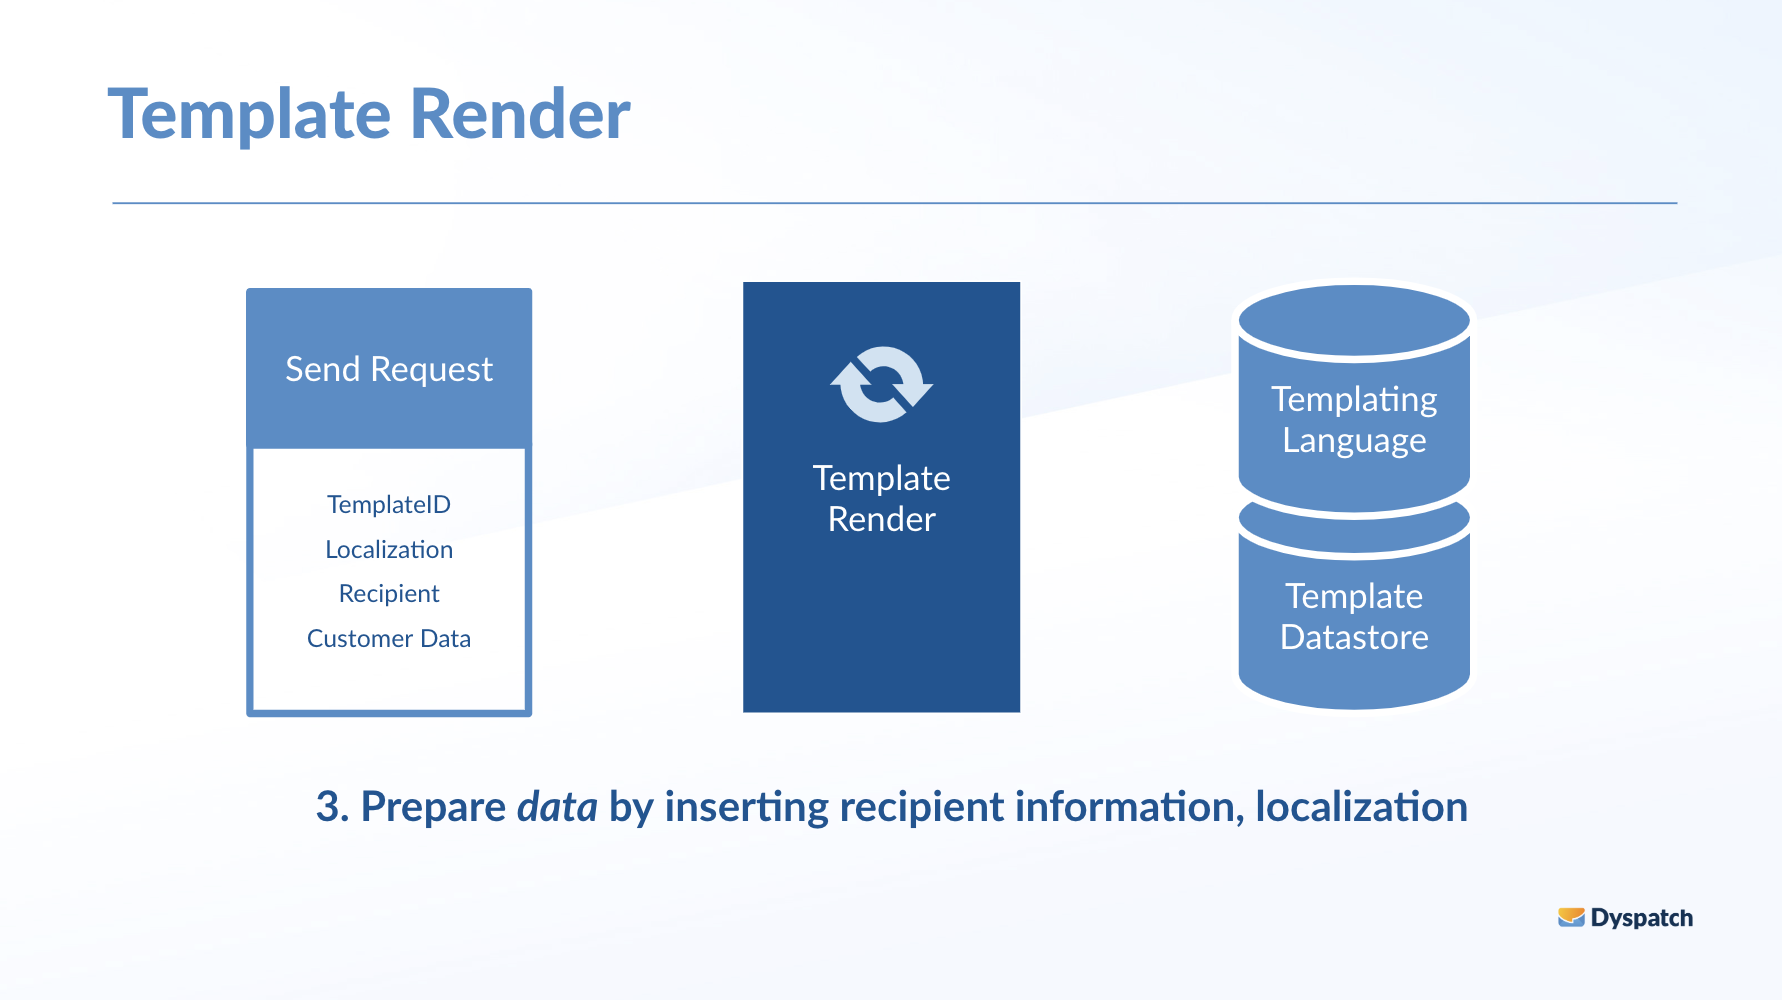 Recipient, sender, and localization data must be injected before rendering.
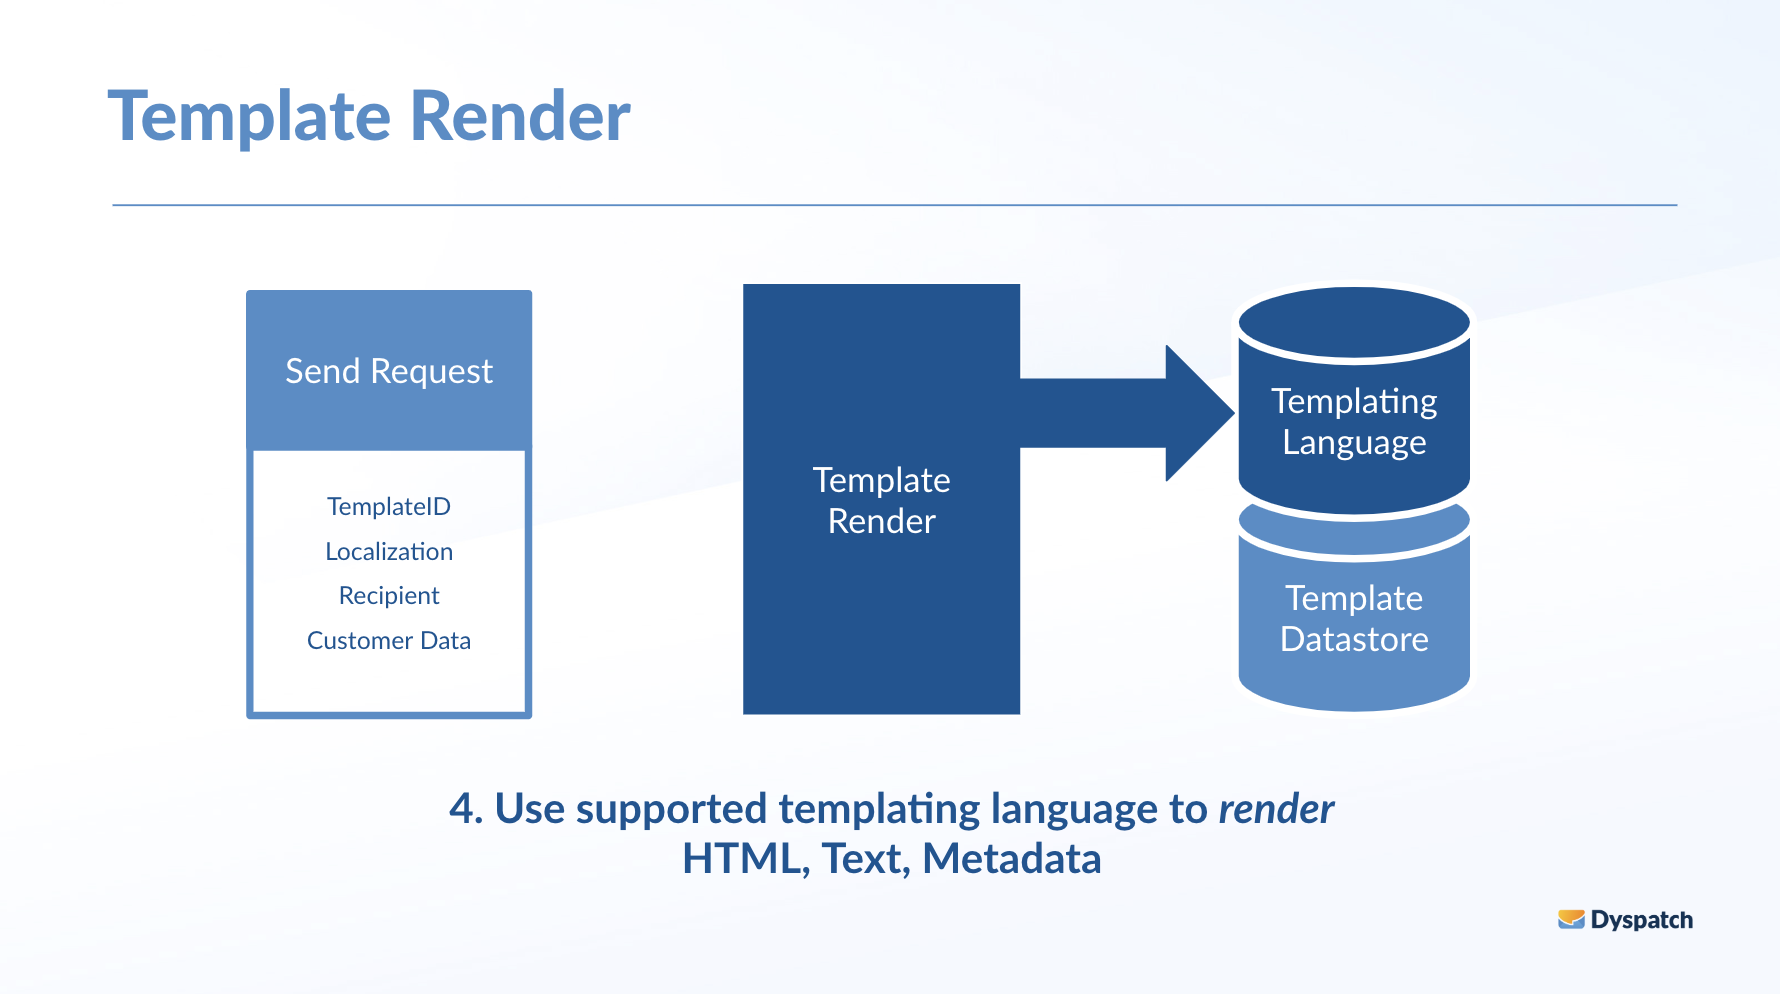
#### 4. Render Using Templating Language
Render the HTML, text, and metadata for the final email. Templates can be fetched and rendered using any of the
supported export languages.
Recipient, sender, and localization data must be injected before rendering.
#### 4. Render Using Templating Language
Render the HTML, text, and metadata for the final email. Templates can be fetched and rendered using any of the
supported export languages.
 #### 5. Return for Sending
The template is customized and rendered for the end user and is ready to be returned for sending.
#### 5. Return for Sending
The template is customized and rendered for the end user and is ready to be returned for sending.
 ## Ready to Send
With Template Sync and Template Render implemented your Digital Messaging Service will be able to serve the most
up-to-date templates from your Dyspatch account and render customized emails ready to be passed on to your Email Service
Provider for sending.
## Ready to Send
With Template Sync and Template Render implemented your Digital Messaging Service will be able to serve the most
up-to-date templates from your Dyspatch account and render customized emails ready to be passed on to your Email Service
Provider for sending.