# Setting up Dyspatch Webhooks
Setting up Dyspatch webhooks allow you to POST data to a specified URL every time an [email template action](#webhook-events) occurs. Follow along on how to get started.
### How to Setup a Webhook Relay
Once you have a URL to which you would like to forward webhook events, navigate to the [Developer Tools](https://app.dyspatch.io/admin/webhooks) page via the Admin Dashboard.

Select the **Webhooks** tab, and click **Add Webhook**.

Add in your Webhook URL and a short description. Once completed, click the **Add Webhook** button.

That's it! Any time you or your team performs an action on an email, Dyspatch will relay a webhook event to your Webhook URL.
We may add new fields and events to our webhooks, but existing fields and events will never be removed or have their type changed without appropriate notification to organization admins and developers. Make sure to account for that appropriately.
### Webhook Events
- `comment_created` - Triggered when a comment is created or replied to in the email builder
- `comment_resolved` - Triggered when a comment is resolved
- `template_locked_for_translation` - Triggered when a draft is locked for translation
- `template_unlocked_for_translation` - Triggered when a draft is unlocked from translation
- `template_submitted` - Triggered when a draft is submitted for approval
- `template_rejected` - Triggered when a draft submission has been rejected
- `template_approved` - Triggered when a draft has been approved by a user
- `template_approved_for_group` - Triggered when a draft has been approved for an approval group
- `template_approved_for_all` - Triggered when an email draft has been approved for all approvers
- `template_published_without_approval`__*__ - Triggered when user skips approval and publishes
- `template_published`__*__ - Triggered when all approvals have been approved for a draft
- `template_exported` - Triggered when a draft is exported to an ESP integration
- `template_unsubmitted` - Triggered when a submitted draft is rolled back
- `template_unpublished` - Triggered when published draft has been rolled back to a previous draft. This webhook contains information for the draft that was rolled back
- `template_republished` - Triggered when published draft has been rolled back to a previous draft. This webhook contains information for the draft getting published
- `template_rollback_publish` - Triggered when a published draft has been unpublished to edit
- `template_submitted_design_review` - Triggered when two step approval enabled and draft submitted for design review
- `template_approved_design_review` - Triggered when two step approval enabled and design review is approved by a user
- `template_approved_design_review_for_group` - Triggered when two step approval enabled and design review is approved for an approval group
- `template_approved_design_review_for_all` - Triggered when two step approval enabled and design review is approved for everyone
- `template_rejected_design_review` - Triggered when two step approval enabled and design review is rejected
- `template_design_approved`__*__ - Triggered when draft in design review receives all approval needed and is moved to step two, localization
- `template_design_approved_without_approval`__*__ - Triggered when two step approval enabled and draft skips approval and continues
- `template_rollback_design_approval` - Triggered when two step approval enabled and design approved draft is rolled back to edit design
- `template_unsubmitted_design_review` - Triggered when two step approval enabled and submitted draft is rolled back
- `template_add_tags` - Triggered when tags are added to a template
- `template_remove_tags` - Triggered when tags are removed from a template
- `draft_add_tags` - Triggered when tags are added to a draft
- `draft_remove_tags` - Triggered when tags are removed from a draft
- `batch_update_tags` - Triggered when tags are added or removed from a group of drafts or templates
*template_published and template_design_approved events do not include user metadata. They are triggered by a coinciding approval event that results in the publish/design_approved event
### Sample Webhook
Dyspatch webhooks are all generally the same shape. The parts of the webhook include:
- `comment` - _Optional._ Contains any HTML styled comment that may have been submitted with the event.
- `draft` - Metadata about the draft.
- `createdAt` - Draft creation timestamp (UTC).
- `id` - Draft ID.
- `name` - Draft name.
- `tags` - Draft tags.
- `updatedAt` - Draft last updated timestamp (UTC).
- `url` - Link to the draft in Dyspatch.
- `event` - Draft event. See supported events in Webhook Events
- `template` - Metadata about the template.
- `createdAt` - Template creation timestamp (UTC).
- `description` - Template description.
- `folder` - Name of the folder the template is located in.
- `id` - Template ID.
- `name` - Template name.
- `path` - Template folder ID.
- `tags` - Template tags.
- `type` - Template type, email or sms.
- `updatedAt` - Template last updated timestamp (UTC).
- `workspaceId` - Template folder ID.
- `text` - Additional text describing the event.
- `user` - Metadata about the user triggering the event.
- `email` - User's email.
- `firstName` - User's first name.
- `lastName` - User's last name.
Here is a sample webhook for the comment_created event.
```json
{
"comment": "
This is a comment left on a template
",
"draft": {
"createdAt": "2022-11-30T18:45:11.008906Z",
"id": "tdft_01gk4xptq0730pc8gsabcd1234",
"name": "First draft",
"tags": [
{
"id": "tag_02jlfksd89345kjl243",
"name": "Draft Tag Name"
}
],
"updatedAt": "2022-12-01T16:16:59.304386Z",
"url":
"https://app.dyspatch.io/template/tem_01234emjkk6grw3bq20wz3vznc/tdft_01gk4xptq0730pc8gsabcd1234"
},
"event": "comment_created",
"template": {
"createdAt": "2022-11-30T18:45:11.00703Z",
"description": "Template description sample text",
"folder": "Test Workspace",
"id": "tdft_01gk4xptq0730pc8gsabcd1234",
"name": "Test template name",
"path": "fdr_01hqtt049rn4018vrh34123456",
"tags": [
{
"id": "tag_01jfds798fsd79fds7fds9",
"name": "Template Tag Name"
},
{
"id": "tag_01890fds786hg98fds8fds",
"name": "Marketing"
},
],
"type": "Type of email, sms, push, or voice",
"updatedAt": "2022-12-01T16:16:59.308662Z",
"workspaceId": "fdr_01hqtt049rn4018vrh34123456"
},
"text": "Comment added to template \"Test template name\": \"This is a comment left on a template\"",
"user": {
"email": "alfred@dyspatch.io",
"firstName": "Alfred",
"lastName": "Pennyworth"
}
}
```
Notice that the `locked_for_translation` event webhook below doesn't include the `comment` field:
```json
{
"draft": {
"createdAt": "2022-11-30T18:45:11.008906Z",
"id": "tdft_01gk4xptq0730pc8gsabcd1234",
"name": "First draft",
"tags": [
{
"id": "tag_02jlfksd89345kjl243",
"name": "Draft Tag Name"
}
],
"updatedAt": "2022-12-01T16:16:59.304386Z",
"url":
"https://app.dyspatch.io/template/tem_01234emjkk6grw3bq20wz3vznc/tdft_01gk4xptq0730pc8gsabcd1234"
},
"event": "template_locked_for_translation",
"template": {
"createdAt": "2022-11-30T18:45:11.00703Z",
"description": "Template description sample text",
"folder": "Test Workspace",
"id": "tdft_01gk4xptq0730pc8gsabcd1234",
"name": "Test template name",
"path": "fdr_01hqtt049rn4018vrh34123456",
"tags": [
{
"id": "tag_01jfds798fsd79fds7fds9",
"name": "Template Tag Name"
},
{
"id": "tag_01890fds786hg98fds8fds",
"name": "Marketing"
},
],
"type": "Type of email, sms, push, or voice",
"updatedAt": "2022-12-01T16:16:59.308662Z",
"workspaceId": "fdr_01hqtt049rn4018vrh34123456"
},
"text": "Draft \"First Draft\" (\"Test template name\") was unlocked for translation by Alfred Pennyworth",
"user": {
"email": "alfred@dyspatch.io",
"firstName": "Alfred",
"lastName": "Pennyworth"
}
}
```
### Verify Webhooks Events
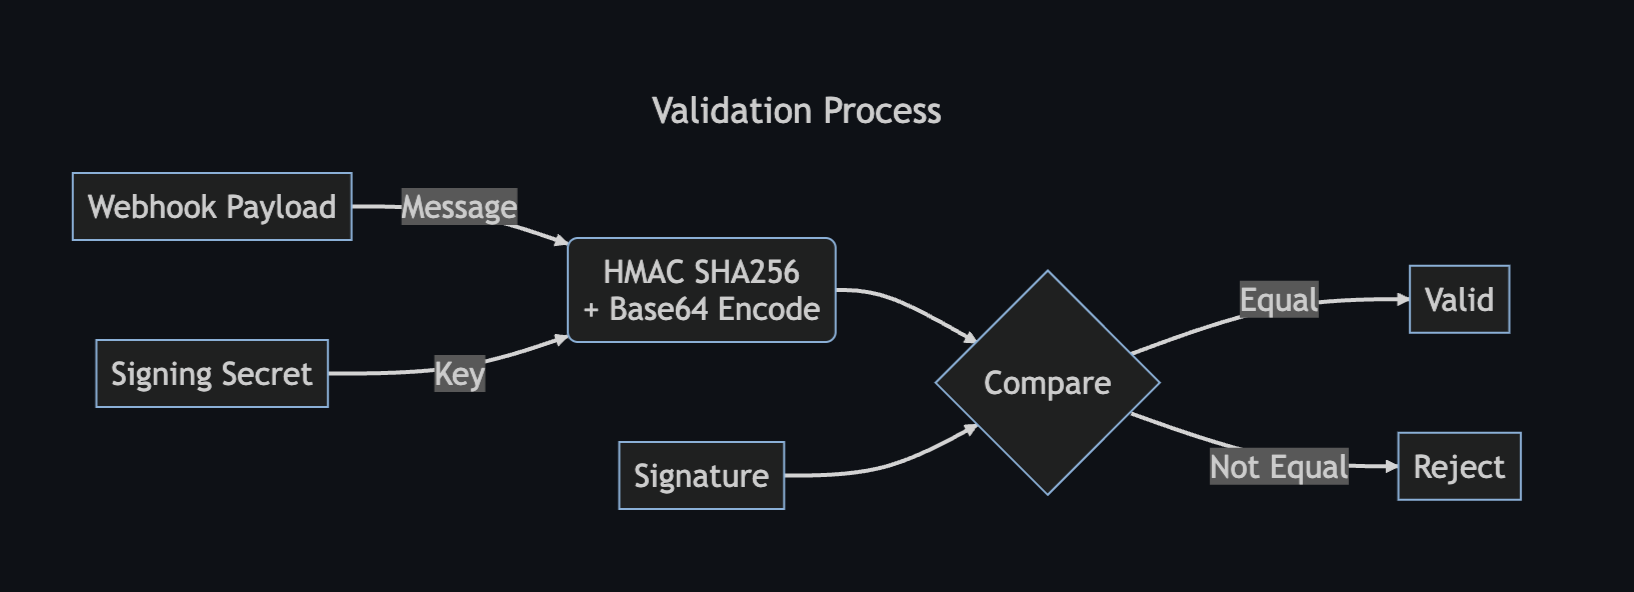
You can verify a webhook is coming from Dyspatch by calculating the digital signature. Dyspatch signs each webhook request event with a `X-Signature` header which is generated with a secret key and the corresponding JSON payload.
#### Retrieve Your Endpoint's Secret
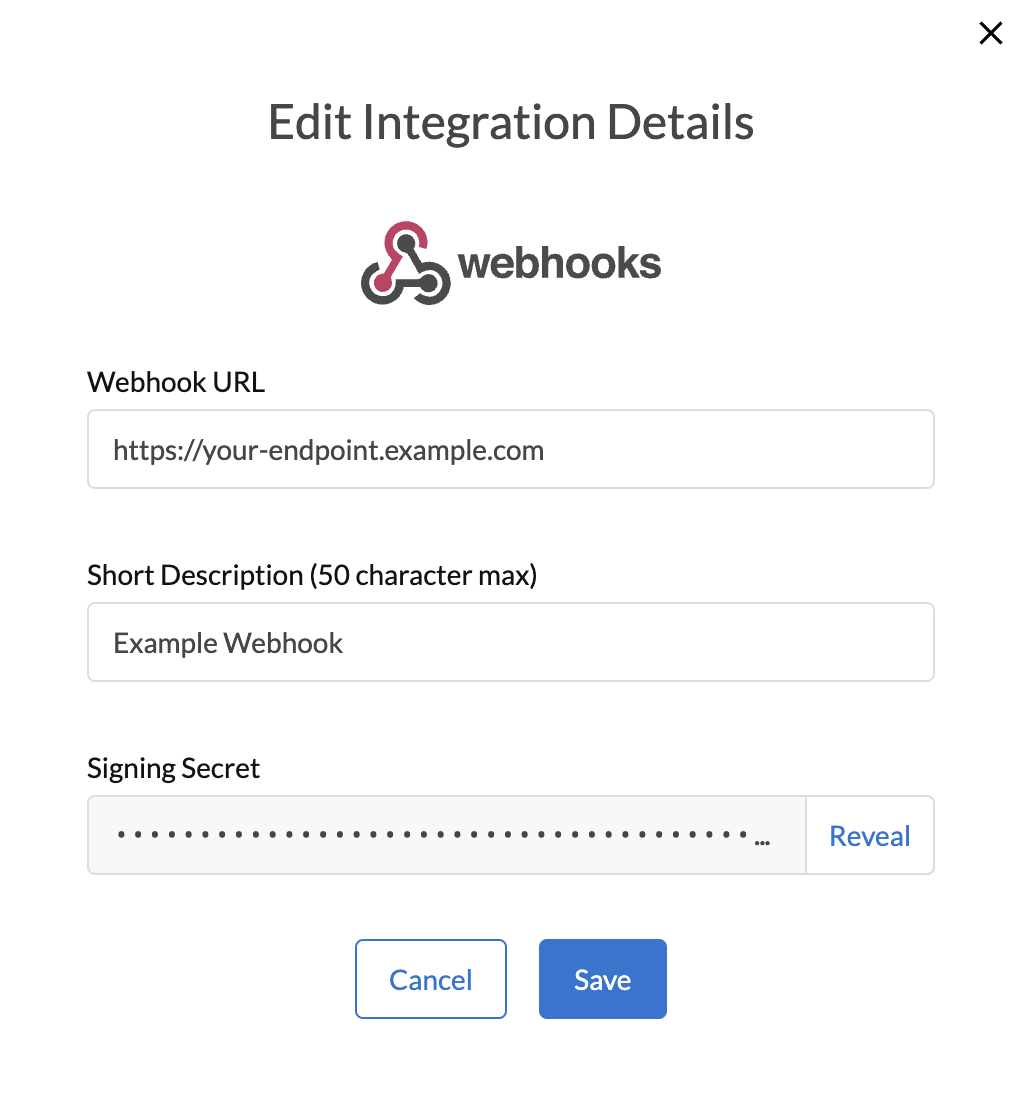
You can find your endpoint's secret by navigating to the Developer Tools > Webhooks tab. Click on the actions dropdown menu () on the Webhook integration and select **Edit Details**. A modal will pop up with your signing secret. Click the **Reveal** option to display your secret.
#### Verify the Signature
Once you have your signing secret, you can compute the HMAC hash (signing secret and JSON payload) and compare it to the `X-Signature` header value from the request. If they are equal, this is a valid request coming from Dyspatch.
 #### Verify the Signature
Once you have your signing secret, you can compute the HMAC hash (signing secret and JSON payload) and compare it to the `X-Signature` header value from the request. If they are equal, this is a valid request coming from Dyspatch.

#### Verify the Signature
Once you have your signing secret, you can compute the HMAC hash (signing secret and JSON payload) and compare it to the `X-Signature` header value from the request. If they are equal, this is a valid request coming from Dyspatch.
