# Part 3: Templating Logic
Discover how to add dynamic behavior to emails using variables, conditionals, and loops in DML. This enables personalized, data-driven email content that adapts at send time or during export.
# DML Templating
Use DML to define your templating logic. When your email is exported, Dyspatch will translate your code to your ESP’s templating language. This makes your code portable — if you change your ESP, Dyspatch will handle the necessary code changes. Test out your code as you build by inputting preview data right inside your block editor:
 ## Variables
- Syntax — `@{name}`, or `@{object.name}` for a nested variable
- Variable names and structures should match the data you will pass in when sending an email
Test your variables by adding matching data to the **Data** tab in the block and email editors, or by using [Customer Profiles](/emails/using_customer_profiles) to preview against real-world data scenarios your email builders can switch through and toggle on and off.
## Variables
- Syntax — `@{name}`, or `@{object.name}` for a nested variable
- Variable names and structures should match the data you will pass in when sending an email
Test your variables by adding matching data to the **Data** tab in the block and email editors, or by using [Customer Profiles](/emails/using_customer_profiles) to preview against real-world data scenarios your email builders can switch through and toggle on and off.
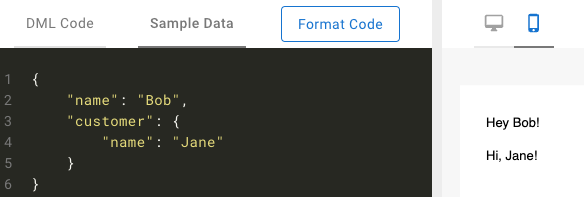
For example, this DML:
```
Hey @{name}!
Hi, @{customer.name}!
```
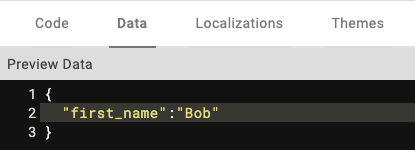
paired with this Data tab entry:
```json
{
"name": "Bob",
"customer": {
"name": "Jane"
}
}
```
renders as:
dys-inputs let you use data-type tags like
dys-string and
dys-bool to set persistent inline preview values at the block level. These persist in previews even when other preview data are turned off. In most cases it is preferable to use the Data tab or
Customer Profiles to preview against real-world data scenarios, which better reflect the variety of data payloads your emails will handle. In previews, Data tab and Customer Profile values take precedence over dys-inputs placeholders when both are present.
View DML Playground Examples:
- Data tab variables example
- Dys-inputs variables example — try adding the Data tab entry above to see it take precedence.
## Conditionals — dys-if
- Define your conditional statement using dys-if with the attribute `cond="condition to evaluate"`
- If your condition is met, the code within ` ` will be rendered
- A full list of the supported comparison operators, modifiers, and logical operators is available in the DML Documentation
```
Block:
Hello @{first_name}!
Thanks for being an active premium member!
Are you enjoying your new kite?
Data:
{
"first_name": "Hina",
"membership": "premium",
"recent_purchase_amount": 100,
"purchases": ["string", "windbreaker", "kite"]
}
```
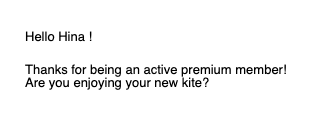
View in
DML Playground
```
Block:
|
Item
|
Price
|
|
@{item.name}
|
@{item.price}
|
Data:
{
"line_items":[
{"name": "Apples",
"price": "$1.00/lb"
},
{"name": "Oranges",
"price": "$1.22/lb"
},
{"name": "Bananas",
"price": "$1.33/lb"
},
{"name": "Grapefruit",
"price": "$0.99/lb"
}
]
}
```
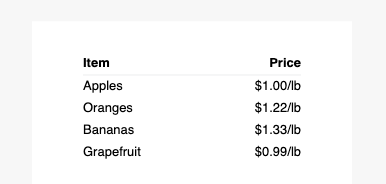
View in
DML Playground
```
This content will show for all export languages.
This content will only show if I am exporting to Handlebars or AMPscript.
Content here goes directly to the email and you won't see content here
in Dyspatch.
Use this to insert templating logic if required.
```
View in
DML Playground