# Styling Emails with Themes


Add custom style and organize your blocks with **Themes** to carry designs across multiple emails. Fonts, background image, link color, and more can be set with the theme editor. Once a theme is created you can handpick only the blocks your theme needs to empower anyone on your team to create design compliant emails with the email builder.

## Getting Started with Themes
Find your themes on the <a href="https://app.dyspatch.io/themes" target="_blank">Themes</a> page. You can create a new theme by selecting **Create New Theme** on the top right corner.

![The themes page](https://docs.dyspatch.io/img/emails/themes-list.png)

Choose a theme to view a list of the blocks and block folders that have been added to the theme with the theme item at the top.

![Viewing a theme with all its blocks on the selected theme's page](https://docs.dyspatch.io/img/emails/themes-theme.png)

Clicking on the theme from the list will open the [theme editor](#the-theme-editor) where you can edit all of its default styling. Select the **Manage Blocks** button to [add or remove blocks](#adding-blocks-to-themes) associated with the theme.

## The Theme Editor
There are two ways to set styling within the theme editor: using the [Standard](#standard-theme-editor-tab) tab, or the [Advanced](#advanced-theme-editor-tab) tab.

### Standard Theme Editor Tab
Styling your theme is simplified in the **Standard** tab of the theme editor. Update common email design needs using the options provided.

![The standard tab within the theme editor with basic options for updating styles](https://docs.dyspatch.io/img/emails/themes-standard-editor.png)

The **Standard** tab contains two sub-tabs:
- **Default** — Configure basic theme styling options like fonts, colors, and layout settings
- **Style Controls** — Fine-tune which editable styles are globally available for each DML element

#### Dynamic Theme Logos
Enable dynamic theme logos to automatically populate logo image and link URLs in your templates using these variables:

- **Image source URL**: `@{DYS.theme.logo.url}` - The URL of the theme's logo image
- **Image href/destination URL**: `@{DYS.theme.logo.href}` - The destination URL when the logo is clicked

When templates are compiled, these variables will be replaced with the actual image URL and href values configured in the theme settings.

**Example usage:**
```twig
<dys-image src="@{DYS.theme.logo.url}" href="@{DYS.theme.logo.href}" alt="Company Logo" />
```

![Theme logo configuration interface in the theme editor with logo URL and href values](https://docs.dyspatch.io/img/emails/theme-logo-setup.png)


#### Enable Editable Styles for Blocks

Give email builders the freedom to customize the design of their emails. This will enable all available styling options for all blocks assigned to this theme, unless individually overridden on the style controls tab. Color picker permissions will be respected.

#### Style Controls Tab

Use **Style Controls** for granular control over which editable styles are available globally for each DML element. This helps prevent email builders from changing critical brand elements (like padding or specific colors) while still giving them creative freedom with other styles, offering a middle ground between leaving all styles editable and manually coding each editable attribute into every block.

![Style Controls tab showing element sections](https://docs.dyspatch.io/img/emails/themes-style-controls-tab.png)

**Using the Style Controls tab:**
- When "Enable Editable Styles for Blocks" is turned on, all editable styles are available by default
- Use Style Control toggles to disable specific styles for individual DML elements (e.g., remove padding editability from columns while keeping them for rows)
- These settings apply globally to all blocks using that element within the theme
- Block-level `editable-styles` attributes always take precedence over theme settings

<div class="highlight tip">See each DML element's editable-styles listed in the <a href="https://docs.dyspatch.io/dml/#components" target="_blank">DML docs</a></div>

**Color Picker Permissions:**

If your theme's Color Picker Permission is set to "Theme Only", you can further refine which color swatches from your theme's palette are available for each color-related style:

![Screenshot showing color swatch selection interface](https://docs.dyspatch.io/img/emails/themes-style-controls-colors.png)

#### Prevent Loner Words

Prevent Loner Words eliminates awkward single words appearing on their own line (aka widows or orphans) by automatically adding non-breaking spaces between the first two and last two words of text content.

![Screenshot showing Prevent Loner Words toggle in Email Builder](https://docs.dyspatch.io/img/emails/prevent-loner-words-toggle.png)

When enabled at either the theme or block level, this feature will appear on editable text elements (like `<dys-text>` and `<dys-title>`) in the email builder, where email creators can toggle it on or off as needed.

Note that variables (like `@{variable_name}`) are treated as single words. If you have a multi-word variable at the start or end of a paragraph, you may want to disable this feature for that element and add the non-breaking space directly into the variable value.

<div class='highlight tip'>Prevent Loner Words can also be enabled/disabled on individual blocks for more granular control</div>

#### Enable Custom Layouts

Enabling custom layouts allows email builders to create custom blocks on the fly from within the email builder.

Disabling this option limits your workspace editors and publishers to building with your team's pre-established blocks.

### Advanced Theme Editor Tab
More customization is available within the **Advanced** tab, where you can use Dyspatch Markup Language (DML) to further customize your blocks and emails. Learn more about theme DML in the <a href="https://docs.dyspatch.io/dml/#themes" target="_blank">DML documentation.</a>

![The Advanced tab within the theme editor with theme DML to set the style](https://docs.dyspatch.io/img/emails/themes-advanced.png)

#### dys-attributes
Set new defaults inside a `<dys-attributes>` tag for DML components like `<dys-text>`. You can also establish your theme's branding colors with `<dys-palette>`, which will be available in the email editor on editable elements. This lets your team write less DML code in the block editor and create more generic blocks that can be used in multiple themes.
```twig
<dys-attributes>
  <dys-body background-color='#F7F7F7' max-width='600px' />
  <dys-title level='h1' color='#414141' font-family='Oxygen, Helvetica neue, sans-serif' font-size='32px' line-height='46px' />
  <dys-text color='#777777' font-family='Oxygen, Helvetica neue, sans-serif' font-size='16px' />
  <dys-a color='#FF6F6F' text-decoration='none' />
  <dys-palette colors='#F7F7F7,#777777,#FF6F6F,#414141' />
</dys-attributes>
```

#### dys-style
Use `<dys-style>` when you need to add CSS to the theme, CSS written inside will be rendered in the `<head>` tag of the email.
```twig
<dys-style>
  h1 {
     color: #CCCCCC;
  }
</dys-style>
```

<div class="highlight note"> <a href="https://docs.dyspatch.io/blocks_and_themes/building_blocks/#style-with-attributes">Inline block styling</a> in your DML block will take precedence over theme styles</div>

#### Setting dynamic attributes and styles in the theme
DML variables can be used for many element styles, or as values within a `dys-styles` CSS declaration. This is often accompanied by a [default value](/emails/using_dml_filters/#default) that will be used if the variable doesn't exist.

In the following example, the background color will take on the `user.favoriteColor` value if it exists, otherwise it will default to white.

```twig
<dys-attributes>
  <dys-body background-color='@{user.favoriteColor|default(#FFFFFF)}' max-width='600px' />
</dys-attributes>
```

Variables are supported as values for the following elements and attributes:
<table>
  <tr style="background-color: #0f4374;">
    <th style="border: 1px solid black;"></th>
    <th style="border: 1px solid black;">dys-body</th>
    <th style="border: 1px solid black;">dys-row</th>
    <th style="border: 1px solid black;">dys-column</th>
    <th style="border: 1px solid black;">dys-text</th>
    <th style="border: 1px solid black;">dys-title</th>
    <th style="border: 1px solid black;">dys-button</th>
  </tr>
  <tr style="background-color: #FFFFFF;">
    <td style="border: 1px solid black;">background-color</td>
    <td style="border: 1px solid black;">✓</td>
    <td style="border: 1px solid black;">✓</td>
    <td style="border: 1px solid black;">✓</td>
    <td style="border: 1px solid black;">-</td>
    <td style="border: 1px solid black;">-</td>
    <td style="border: 1px solid black;">✓</td>
  </tr>
  <tr style="background-color: #D3D3D3;">
    <td style="border: 1px solid black;">border<br/>border-color<br/>border-radius</td>
    <td style="border: 1px solid black;">-</td>
    <td style="border: 1px solid black;">✓</td>
    <td style="border: 1px solid black;">✓</td>
    <td style="border: 1px solid black;">-</td>
    <td style="border: 1px solid black;">-</td>
    <td style="border: 1px solid black;">✓</td>
  </tr>
  <tr style="background-color: #ffffff;">
    <td style="border: 1px solid black;">inner-background-color<br/>inner-border<br/>inner-border-radius</td>
    <td style="border: 1px solid black;">-</td>
    <td style="border: 1px solid black;">-</td>
    <td style="border: 1px solid black;">✓</td>
    <td style="border: 1px solid black;">-</td>
    <td style="border: 1px solid black;">-</td>
    <td style="border: 1px solid black;">-</td>
  </tr>
  <tr style="background-color: #D3D3D3;">
    <td style="border: 1px solid black;">color<br/>font-size<br/>font-weight<br/>font-family<br/>font-style<br/>container-background-color</td>
    <td style="border: 1px solid black;">-</td>
    <td style="border: 1px solid black;">-</td>
    <td style="border: 1px solid black;">-</td>
    <td style="border: 1px solid black;">✓</td>
    <td style="border: 1px solid black;">✓</td>
    <td style="border: 1px solid black;">✓</td>
  </tr>
  <tr style="background-color: #ffffff;">
    <td style="border: 1px solid black;">icon-src</td>
    <td style="border: 1px solid black;">-</td>
    <td style="border: 1px solid black;">-</td>
    <td style="border: 1px solid black;">-</td>
    <td style="border: 1px solid black;">-</td>
    <td style="border: 1px solid black;">-</td>
    <td style="border: 1px solid black;">✓</td>
  </tr>
</table>

<div class="highlight note">The theme and email builders will preview variables styles with <a href="/emails/using_customer_profiles/#using-global-variables">global variable data</a> by default, if it exists. You can use the <a href="/emails/testing_your_email_with_preview_data/#building-preview-data-using-the-data-builder">email data</a> tab or <a href="/emails/using_customer_profiles/">customer profiles</a> to preview different possible datasets</div>

#### dys-font
Add custom fonts with `<dys-font>` tag by including the URL to the hosted font and the name of the font. With `<dys-font>` you can safely include your web fonts or any hosted fonts. Add a separate dys-font tag for each custom font you'd like to import into your theme.
```twig
<dys-font href="https://fonts.googleapis.com/css?family=Oxygen:300,400,700&display=swap" name="Oxygen" />
```

## Adding Blocks to Themes
Add blocks to a theme to make them available in email builder. To add multiple blocks to a theme, select the theme on the <a href="https://app.dyspatch.io/themes" target="_blank">Themes</a> page and click **Manage Blocks**.

![The add and remove blocks page with a list of blocks you can select or unselect from the theme](https://docs.dyspatch.io/img/emails/themes-add-blocks.png)

Blocks can be added to the theme by clicking the block's row from the list. Blocks can be assigned to multiple themes.

To add a block to one or more themes from the **Block Editor**, go to the **Settings > Theme Assignment** tab in the block editor and toggle the slider to the right of a theme to **Active**.

<img class="img-border" src="https://docs.dyspatch.io/img/emails/themes-in-block-editor.png" alt="The themes tab in the block editor with a list of themes that can the block can be added to by toggling from inactive to active"/>

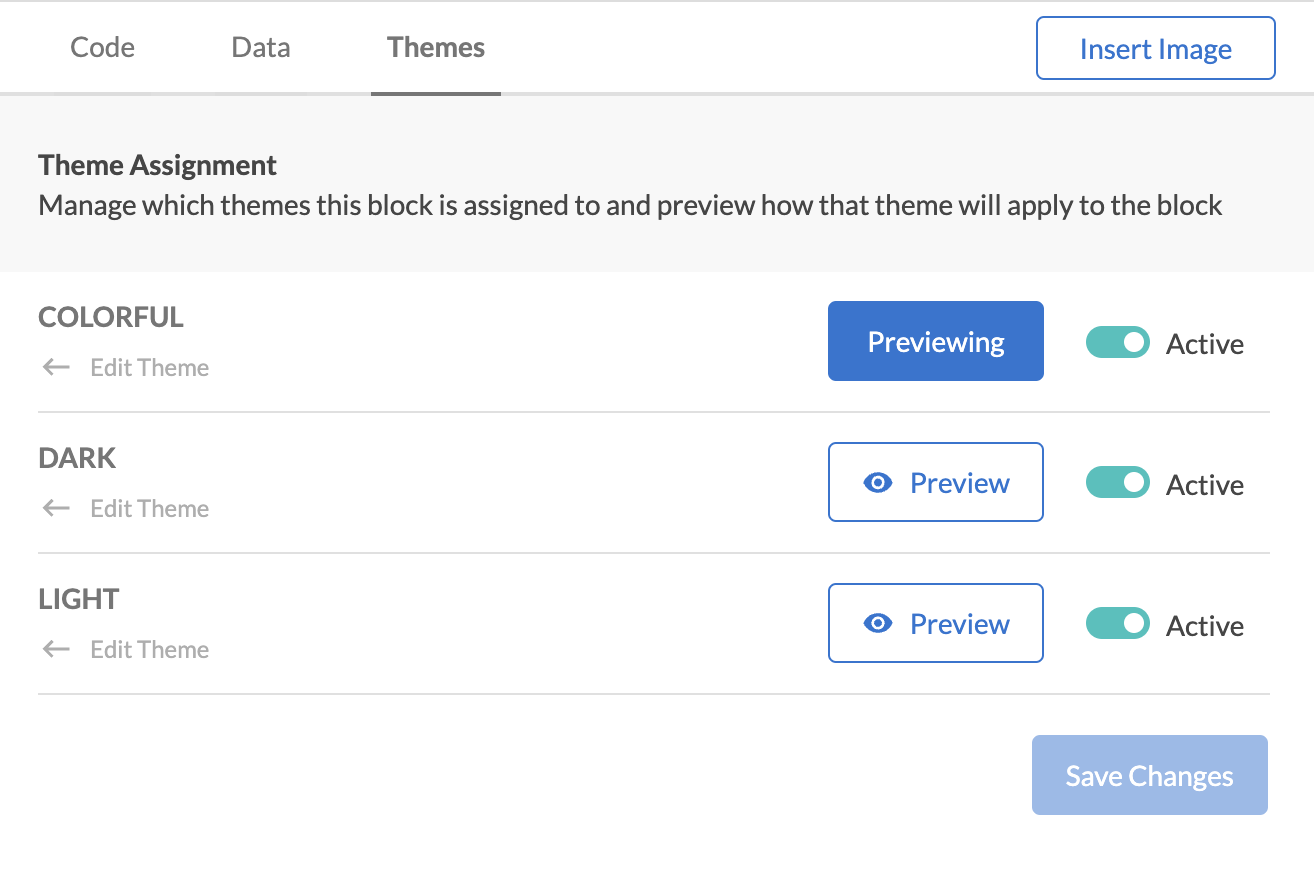
You can also manage the themes a block is assigned to when viewing the block in a theme, or the block list. Find the block and select **Theme Assignment** from the block's drop-down menu.

![Change a the themes a block is assigned to by selecting the drop-down menu on a block](https://docs.dyspatch.io/img/emails/themes-block-assignment.png)

## Assigning Themes to Workspaces
Make your teams' email building process flawless by assigning and excluding workspaces from a theme.

Set [workspace access levels](/administration/dyspatch_roles/#workspace-access-levels) for users and teams so that each team only has access to the themes they need.

Toggle which workspaces a theme is assigned to by selecting the theme from the <a href="https://app.dyspatch.io/themes" target="_blank">Theme page</a>, then selecting **Workspace Assignment** from the " <svg xmlns="http://www.w3.org/2000/svg" width="3" height="11" viewBox="0 0 3 11"><title>3 dot</title><path fill="currentColor" fill-rule="evenodd" d="M1.344 8c.363 0 .677.133.944.4.267.267.4.581.4.944s-.133.677-.4.944c-.267.267-.581.4-.944.4s-.677-.133-.944-.4a1.291 1.291 0 0 1-.4-.944c0-.363.133-.677.4-.944.267-.267.581-.4.944-.4zm0-4c.363 0 .677.133.944.4.267.267.4.581.4.944s-.133.677-.4.944c-.267.267-.581.4-.944.4s-.677-.133-.944-.4a1.291 1.291 0 0 1-.4-.944c0-.363.133-.677.4-.944.267-.267.581-.4.944-.4zm0-1.312a1.29 1.29 0 0 1-.944-.4 1.291 1.291 0 0 1-.4-.944C0 .981.133.667.4.4.667.133.981 0 1.344 0s.677.133.944.4c.267.267.4.581.4.944s-.133.677-.4.944a1.29 1.29 0 0 1-.944.4z"></path></svg> " menu icon.

![Theme menu expanded with the workspace assignment option highlighted](https://docs.dyspatch.io/img/emails/themes-dot-menu.png)

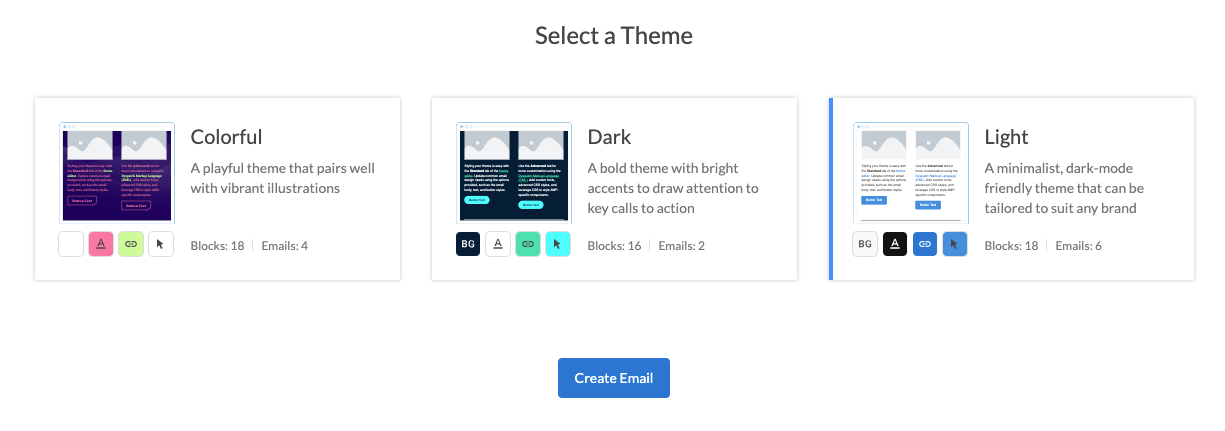
## Choosing a Theme for an Email

When creating a new email, you will be prompted to select a theme.

<img class="img-border" src="https://docs.dyspatch.io/img/emails/getting-started-themes.png" alt="Selecting a theme while creating a new email"/>

If you'd like to change an email's theme after it's been created, select the theme name from above the blocks panel and click **Change Theme**.

<img class="img-border" src="https://docs.dyspatch.io/img/emails/change-theme-eb.png" alt="Change theme dropdown option from inside of the email builder"/>

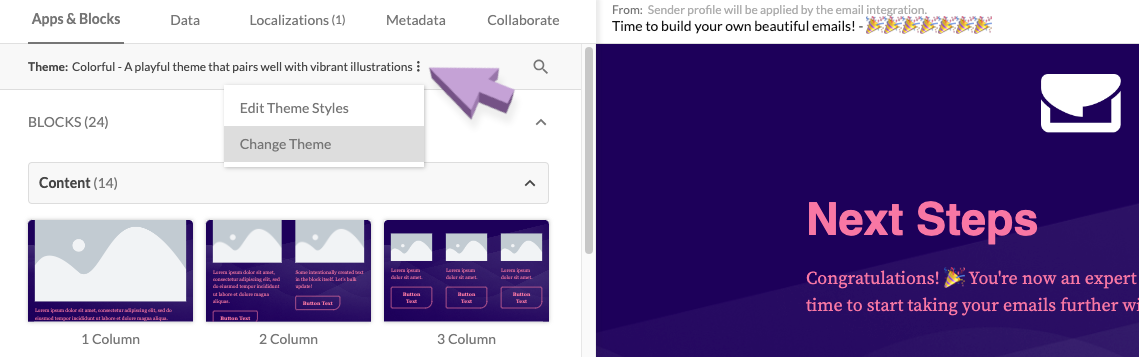
The theme's styles will be automatically applied to the email's preview, when testing with device previews or send to self, and when exporting the email. You can see which theme is being used in an email at the top of the blocks tab within the email editor.

<div class="highlight tip">Only the blocks that have been added to the theme will be available in the email builder</div>